Tuesday, April 16, 2024

Cyberdeck: "System In A Box" Build

Cyberdeck v1 Build

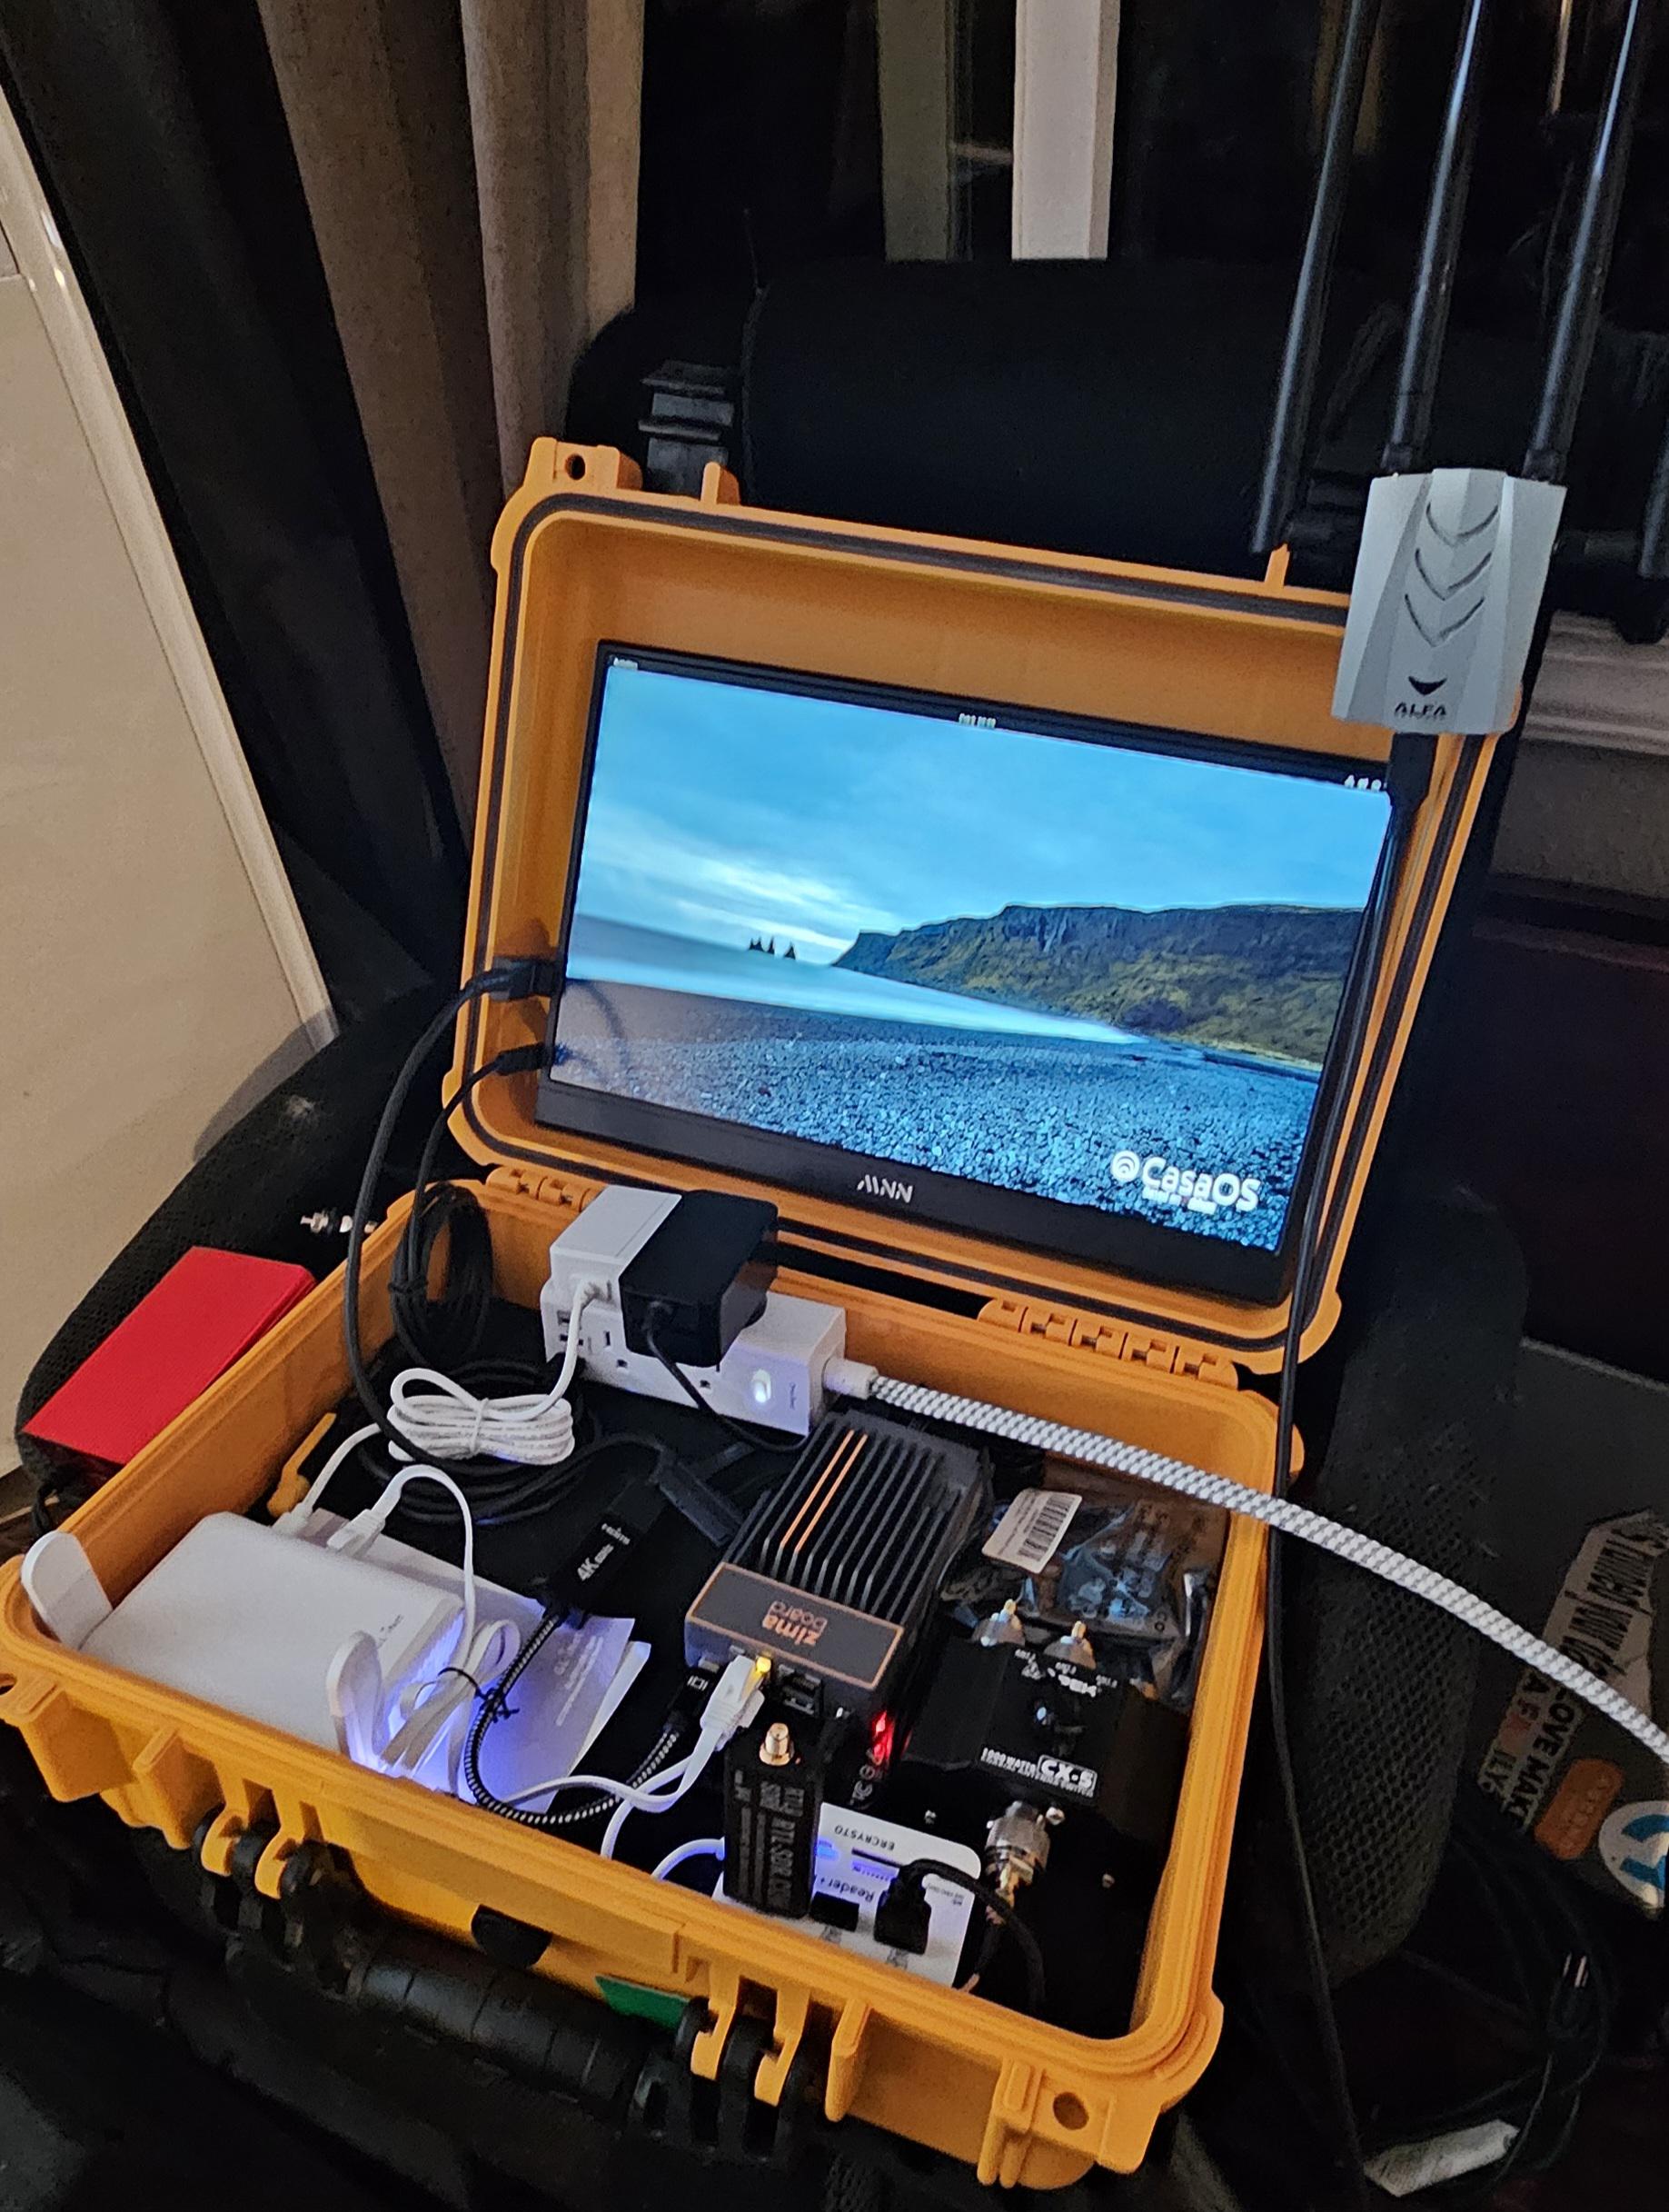
The goal of building this "system in a box" was to put something together that was a full-fledged portable network, had a mini-server, SDR/radio capabilities, GPS, and Bluetooth, all on the go! But it needed to be powered by a portable battery (such as a Jackery) or via a power inverter from a car. 
This is what I came up with and is my first attempt at this "system in a box" Cyberdeck! This build has been working MUCH better than I expected and has come together very well, but I am still tweaking and modifying stuff over time and am open to suggestions :)

The main parts used in this build...

Pacific NW Computers

Flipper Zero: Tips & Tricks To Help Get You Started!

Flipper Zero: Tips & Tricks

So what is a Flipper Zero anyway?
The Flipper Zero website describes the device as "a portable multi-tool for pen-testers and geeks in a toy-like body. It loves hacking digital stuff, such as radio protocols, access control systems, hardware, and more. It's fully open-source and customizable, so you can extend it in whatever way you like."

I do own and use a Flipper Zero, but I do NOT use it for anything nefarious and don't plan on ever using it for anything like that. But I do find it VERY handy to learn about digital security risks around me with my own systems, as well as help identify and secure weaknesses for my clients! 

If you do end up purchasing one of these devices, I have a few tips to help get you going!

  1. You NEED to have a micro SD Card to be able to set up and use your Flipper Zero, but the Flipper Zero unfortunately does NOT come with an SD card.
    • Use a 32GB or smaller micro SD card; the higher the quality the better!
    • I typically format an SD card with exFAT, FAT16, or FAT32 on a computer before installing the MicroSD card into Flipper Zero. I have run into issues formatting a micro SD card through the Flipper Zero itself. So I recommend formatting your micro SD card using a computer before you install it into your Flipper Zero.
  2. Install the qFlipper software and with your Flipper Zero connected to a computer installed with qFlipper, update your Flipper Zero's firmware and databases:
  3. Next, I like to install third-party firmware. Lately have been a BIG fan of the Flipper Xtreme firmware due to its pre-installed features and tools: 
  4. Next, I recommend going through the FlipperZero Online Documentation to learn how to use the different/various functions of the FlipperZero:
  5. There is also a YouTube channel from a creator called "The Talking Sasquatch" that has some great guides to help you get going using a Flipper Zero as well!

Recommended Add-Ons:


Pacific NW Computers

Monday, April 1, 2024

What Specs Do You Need In A New Computer!?

CPUs:

Both Intel and AMD employ a numbering system to classify their CPU models based on their respective performance.

AMD Ryzen Series:
  • Ryzen 3: Entry-level processors suitable for basic tasks.
  • Ryzen 5: Mid-range CPUs with good performance for multitasking and light gaming.
  • Ryzen 7: High-performance processors designed for demanding tasks, including content creation and gaming.
  • Ryzen 9: Top-tier CPUs for power users, professionals, and enthusiasts.
Intel Core Series:
  • i3: Entry-level processors for everyday computing needs.
  • i5: Mid-range CPUs offering a balance of performance and affordability.
  • i7: High-performance processors suitable for gaming, content creation, and productivity.
  • i9: Premium CPUs with exceptional performance for intensive workloads.

Higher model numbers generally indicate better performance, but it’s essential to consider other factors like clock speed, cache size, and core count. We usually recommend CPUs be 2Ghz or higher.

Wednesday, March 27, 2024

Upgrade To Windows 11 ~ With Your Apps and Data Intact!

 Can You Install Windows 11,
Without Losing Apps or Data In The Process? 

Why yes you can! 

Thanks to the Windows Installation Assistant!


I found an article (linked below) while looking into a "surefire" way to upgrade a Windows 10 system to Windows 11, without having to run the risk of needing to reinstall software and applications, or even potentially loose data. Currently, the only guaranteed method to install Windows 11 on your computer without performing a fresh install is by using the Installation Assistant. This tool from Microsoft acts as an update, transforming your existing Windows installation to the newer version without affecting any of the files or applications:

 https://helpdeskgeek.com/windows-11/how-to-upgrade-to-windows-11-without-losing-any-data/


Jon Pienkowski
Pacific NorthWest Computers

Wednesday, March 13, 2024

What 3D Printer to Get?!


Want to get into 3D printing?!


If money isn't a limiter:

The Bambu Lab x1 Carbon is hands down the best thing on the market for consumer-level printers as well as multi-material printers, IMO:
https://us.store.bambulab.com/products/x1-carbon-combo...

If you're on a budget:

Just want to get rocking as easily as possible? 
Elegoo all day long... 
Test the waters and see if you enjoy 3D printing; without a huge investment.
ELEGOO Neptune 4 Pro 3D Printer: https://a.co/d/eTdGxML

Most reliable:

Want an open source, heavily modifiable, as well as a production reliable machine?
Prusa all day long! 
My Prusa MK3S has been by far, my most reliable printer:
https://www.prusa3d.com/product/original-prusa-mk4-2/...


Jon Pienkowski
Pacific NW Computers

Tuesday, March 12, 2024

VHD & RMD IODD Drive Setup

IODD Encrypted External Drive; 

VHD/RMD Creation

  1. Use the VHD_Tool+ that you can download from the IODD website:
    http://iodd.kr/wordpress

  2. Open and run the VHD Tool+, and click on the "Create" tab. That will switch the program to its VHD "Create" function, where you will be able to create a blank/empty VHD on your IODD drive that you will later apply/"burn" a disk image to.
    • When you click on the folder icon to "browse for a VHD" you actually just need to type in the name of the VHD that you would like to create, and then continue like you are going to "open" that new VHD; even though it is not actually there. Trust me, it will work.

  3. Next, you want to make sure the VHD file that you are creating is larger than the ISO that you will be applying to that VHD. The ISO has to be able to fit fully decompressed. So if your ISO is still in a ZIP file, decompress it and go 1GB above its folder properties listed size.

  4. Once the VHD is created on your IODD drive, you need to actually mount that blank VHD to your computer. 

  5. With the IODD drive connected to your computer, navigate to where the VHD is stored using the screen/menus on the IODD itself, and mount the empty/new VHD file through the drive, and your computer will detect and pop-up that it has found a drive that needs to be formatted.
     
  6. Don't format the drive! Just close out the notification and close any explorer windows that may have opened.

  7. Now, using a program such as Rufus, you can "burn" or apply an ISO disk image to the new/empty VHD that you just mounted to your system!

  8. Burn the disk image just like you are creating a bootable USB or DVD; nothing special needs to be done to make things work.

  9. Lastly, to create an RMD of the VHD you just created, simply make a copy of the VHD file (so you have two) and simply change the copy's file extension from *.vhd to *.rmd

    That's it!


IODD Help Site:

https://help.iodd.kr/bootable-virtual-drive/drive-setup

IODD Help Page for VHD Creation:

https://help.iodd.kr/bootable-virtual-drive/virtual-drive-vhd/convert-iso-file-to-uefi-bootable-drive

IODD User Manual:

http://dir.iodd.kr/vhd_tools/iodd_virtual_USB_drive_guide_0425.pdf


Jon Pienkowski
Pacific NW Computers

Computer Custom Water Cooling Loop Tips

 Custom Computer Watercooling Tips

  • Radiator(s):

    • If you are NOT going to overclock your system, I like to use a general rule of 120mm of radiator real estate for every part that is going to be cooled.
    • If you ARE going to overclock the system, I like to use a general rule of 240mm of radiator real estate for every part that is going to be cooled.
    • You can never have too big of a radiator for cooling using the rules above. You can however VERY easily have a system with too small of a radiator for its needed cooling. You can't have too much radiator surface area, so don't worry about having MORE than you "need".
    • If you are mounting a radiator vertically for your water cooling loop, make sure that the fittings for the radiator's input/output are at the BOTTOM; closest to the bottom of the computer case!! This will allow better fluid circulation and prevent poor circulation that commonly occurs when you have the inlet/output of the radiator oriented at the top.

  • Fittings:

    • Soft tubing fittings use barbs to grab onto and connect with the appropriate tubing.
    • Hard tubing uses a compression fitting to connect to its tubing.
    • The collar of a hardline fitting is not what's responsible for sealing the connection with the tubing that it's being connected to.
    • As long as the compression of the fittings and the tubing both match each other (ie: 10x13mm for the fitting AND for the hose/tubing being used), then you know the two will be compatible to create a water-tight seal between the fitting and the tubing.

  • Fans:

    • For airflow, some fans will have an arrow somewhere on the fan itself to indicate the direction in which air will flow when the fan is turned on.
    • If there isn't a directional arrow/indicator, the rule of thumb that I like to use is that a fan's airflow is 99% of the time going to be moving from the "caged" side of the fain (where the fan is connected to and supported by the fan's frame), to the "non-caged" side. I know, super technical jargon is being used here... But it's a simple way to easily remember which direction a fan's air will flow!
    • You can also buy/3D print a fan spacer to install between the fan and the radiator to help prevent naturally occurring turbulence due to the fan's proximity to the radiator.

  • Tubing/Hoses:

    • Hard tubing is the least porous and the least prone to water loss/seepage. But hard tubing is also the most difficult to work with due to the fact it needs to be heated and bent into needed shapes; which requires its own special tools and processes to complete.
    • Soft tubing is not as "nice" as hard tubing as far as looks and performance are concerned, but it is MUCH easier to install, work with, and cheaper to buy/replace vs. hard tubing.
    • Try to use low-porosity tubing to prevent liquid absorption/seepage/loss and leaking.

  • Fluid/Liquids:

    • Configure your loop with a drain port; preferably at the bottommost position of your loop.
    • Try to install your pump directly under your reservoir, or use a reservoir/pump combo.
    • Use DISTILLED WATER if you are not going to use any fancy-colored/specialized liquid.
    • Add a little bit of a Biocide, like Iodine, to your liquid medium to help prevent bacteria or other organic growth
    • DO NOT USE FOOD COLORING TO COLOR YOUR COOLING LIQUID!
    • BEFORE you fill your loop with ANY liquid whatsoever, use a simple hand air pump to do a basic pressure test and make sure none of your tube connections or fittings blow out or come loose.
    • DO NOT FULLY POWER ON YOUR SYSTEM TO FILL YOUR LOOP!
      • Most loop kits come with (or you can purchase) a basic PC power supply "jumper" plug that will allow you to power the system at a very low lever, without actually fully powering the computer on.
      • That way you can add fluid to your loop's reservoir, use the PSU jumper to power on the PSU and pump the fluid through the loop, and then just rinse/repeat until the loop is fully filled!

  • Flow Order:

    • Flow Order is the order in which you are going to cool the devices in your custom loop. 
    • It doesn't really matter about what order you go in, and you DO NOT need a totally separate loop for each device being cooled. There might be a 2-3C temperature difference when daisy chaining devices together in a custom loop; nothing CRAZY. So it IS ok to go from a GPU to a CPU directly in a custom loop.
    • An optimal Flow Order looks something like this when cooling a GPU & CPU:
Reservoir/Pump > 360mm Rad > GPU > CPU > 360mm Rad #2 > Back to Reservoir


Jon Pienkowski
Pacific NW Computers

Tuesday, March 5, 2024

Scan/Repair Corrupted Windows 10 & Windows 11 System Files

1) Open an elevated Command Prompt:

2) In the command prompt, enter the following commands one at a time. Let each procedure fully complete its process before moving on to the next command/repair.

  1. SFC /SCANNOW
  2. DISM /Online /Cleanup-Image /StartComponentCleanup
  3. DISM /Online /Cleanup-Image /RestoreHealth

3) Restart the system and verify repairs were completed successfully.

4) If issues persist after running these repairs, running a repair installation of the Windows Operating System (being sure to retain user data) would be the next step in hopes of repairing the system:

https://support.microsoft.com/en-us/windows/reinstall-windows-d8369486-3e33-7d9c-dccc-859e2b022fc7#bkmk_reset_windows_10

Jon Pienkowski
Pacific NW Computers

Monday, January 15, 2024

Lenovo Legion Y740 Series Keyboard Issues

Lenovo Legion Y740 Series Keyboard Issues

Links to the needed firmware update(s) to fix  Lenovo Legion Y740 series RGB keyboard functionality/stops working issues.

Firmware Software Needed: kyb17fw03u

Lenovo Legion Y740 Series 15" Model:

https://download.lenovo.com/consumer/mobiles/kyb15fw02u/kyb15fw02u.exe


Lenovo Legion Y740 Series 17" Model:

https://download.lenovo.com/consumer/mobiles/kyb17fw02u/kyb17fw02u.exe


Jon Pienkowski
Pacific NW Computers

Thursday, October 19, 2023

How To Protect Yourself From Scammers

How To Protect Yourself From Scammers

Scammers are versatile in their tactics, posing as various entities, including banks, real estate agencies, utility companies, and even family members or government agencies. They often employ pressure tactics to create a false sense of urgency, leading to rushed decisions and financial losses. To safeguard your interests, it's essential to be vigilant and take proactive steps to prevent falling victim to scams. This article offers insights and tips on how to protect yourself from scammers.


Question Too-Good-To-Be-True Offers

Scammers often dangle tempting promises of high returns, low risk, and "golden" opportunities. If something sounds too good to be true, it probably is. Take your time to ask questions, verify claims, and conduct due diligence before making any financial commitments. This cautious approach can help you avoid falling prey to fraudulent schemes.

Be Wary of "Grandparent Scams"

One common scam involves imposters claiming to be family members, especially grandparents, seeking financial help. If someone purports to be a family member, independently verify their identity by calling them directly. In cases where you suspect a family member needs assistance, reach out to them through a trusted phone number or in-person contact. Avoid responding to such pleas via email, social media, or text, and always consult with the person's parents before sending money to a potential scammer.

Guard Your Passwords and PINs

Your passwords and PINs are the keys to your online security. Never share them, even with close friends, family, or relatives. Keeping this information confidential is vital for safeguarding your financial and personal data.

Protect Against Phishing Emails

Phishing emails are a favored tool among scammers. Pay close attention to any email that appears as a bill or a security alert. Be cautious if you notice misspelled words, your name is absent, the links seem suspicious, or if you're asked to "verify" your account or personal information. In such cases, delete the email and promptly report it to the relevant authorities.

Implement Security Best Practices

  • Be Cautious with Money Transfers: 
    • Avoid sending money to individuals you don't know in real life, particularly through third-party services like Zelle, Venmo, and Cash App. 
    • Refrain from using gift cards to settle bills; legitimate businesses do not request payment via gift cards.
  • Ignore Unsolicited Messages: 
    • Delete random texts and emails that ask you to click a link or provide personal information.
    • Never click on links from untrusted sources.
  • Regularly Monitor Your Accounts: 
    • Stay vigilant by regularly monitoring your financial accounts. 
    • Respond promptly to fraud alerts and report any unauthorized transactions.

Enable Multifactor Authentication

For added security, enable multifactor authentication (MFA) for your accounts whenever possible. MFA provides an extra layer of protection that can thwart account hacks or hijacks even if a malicious actor obtains your login information.

Understanding Fake Websites and How Scammers Exploit Them

Fake websites are tools scammers use to deceive individuals into divulging sensitive information, downloading malware, or making purchases from non-existent products. Scammers often employ these websites as part of phishing attacks.

Recognizing fake websites is becoming increasingly challenging. To ensure you're not dealing with a fraudulent website, remain vigilant and apply the aforementioned protection measures. By staying informed and exercising caution, you can significantly reduce your vulnerability to scams and safeguard your online security.

In conclusion, being proactive, skeptical, and informed is the best defense against scammers. Protect your personal and financial information by following these guidelines, and remember that it's always better to be cautious than to fall victim to fraudulent schemes.


We Also Recommend Reading:


Jon Pienkowski
Pacific NW Computers